Using Incoming Correspondence
What the Incoming Correspondence screen does and how to work with it, from finding an item to finishing it. Use the list on the left to jump to a topic, or Search this manual to find a word on this page.
What the Incoming Correspondence Screen Does
Everything that arrives into the system – emails sent to your inboxes and scanned paper
documents – lands on this screen. As each item arrives, the system reads it and works through
three questions:
- Who is it from? An email is treated as lender correspondence when the sender’s
address belongs to a lender. - Who does it belong to? References, agreement numbers and client details in the
text are matched to a client and claim. No match: the item goes to Unlinked. - What is it? The text is compared with each category’s match phrases. No match:
Uncategorised. A match files the item under that category, sets any questionnaire
answers, and creates the category’s follow-up – waiting in Pending Review until it
runs, then Processed.
Your job on this screen is to fill the gaps the system could not: link items, tell the
system what an item is, and deal with items that need a human decision. From the same screen
you can reply, send letters, emails and texts from the template library, and put follow-up work
on the claim – all filed against the claim automatically.
Administrators: see Setting Up (Administrators) for everything that has to be in place first.
Finding Your Way Around
Open the screen with Correspondence in the bar at the top of the
Agent Portal.

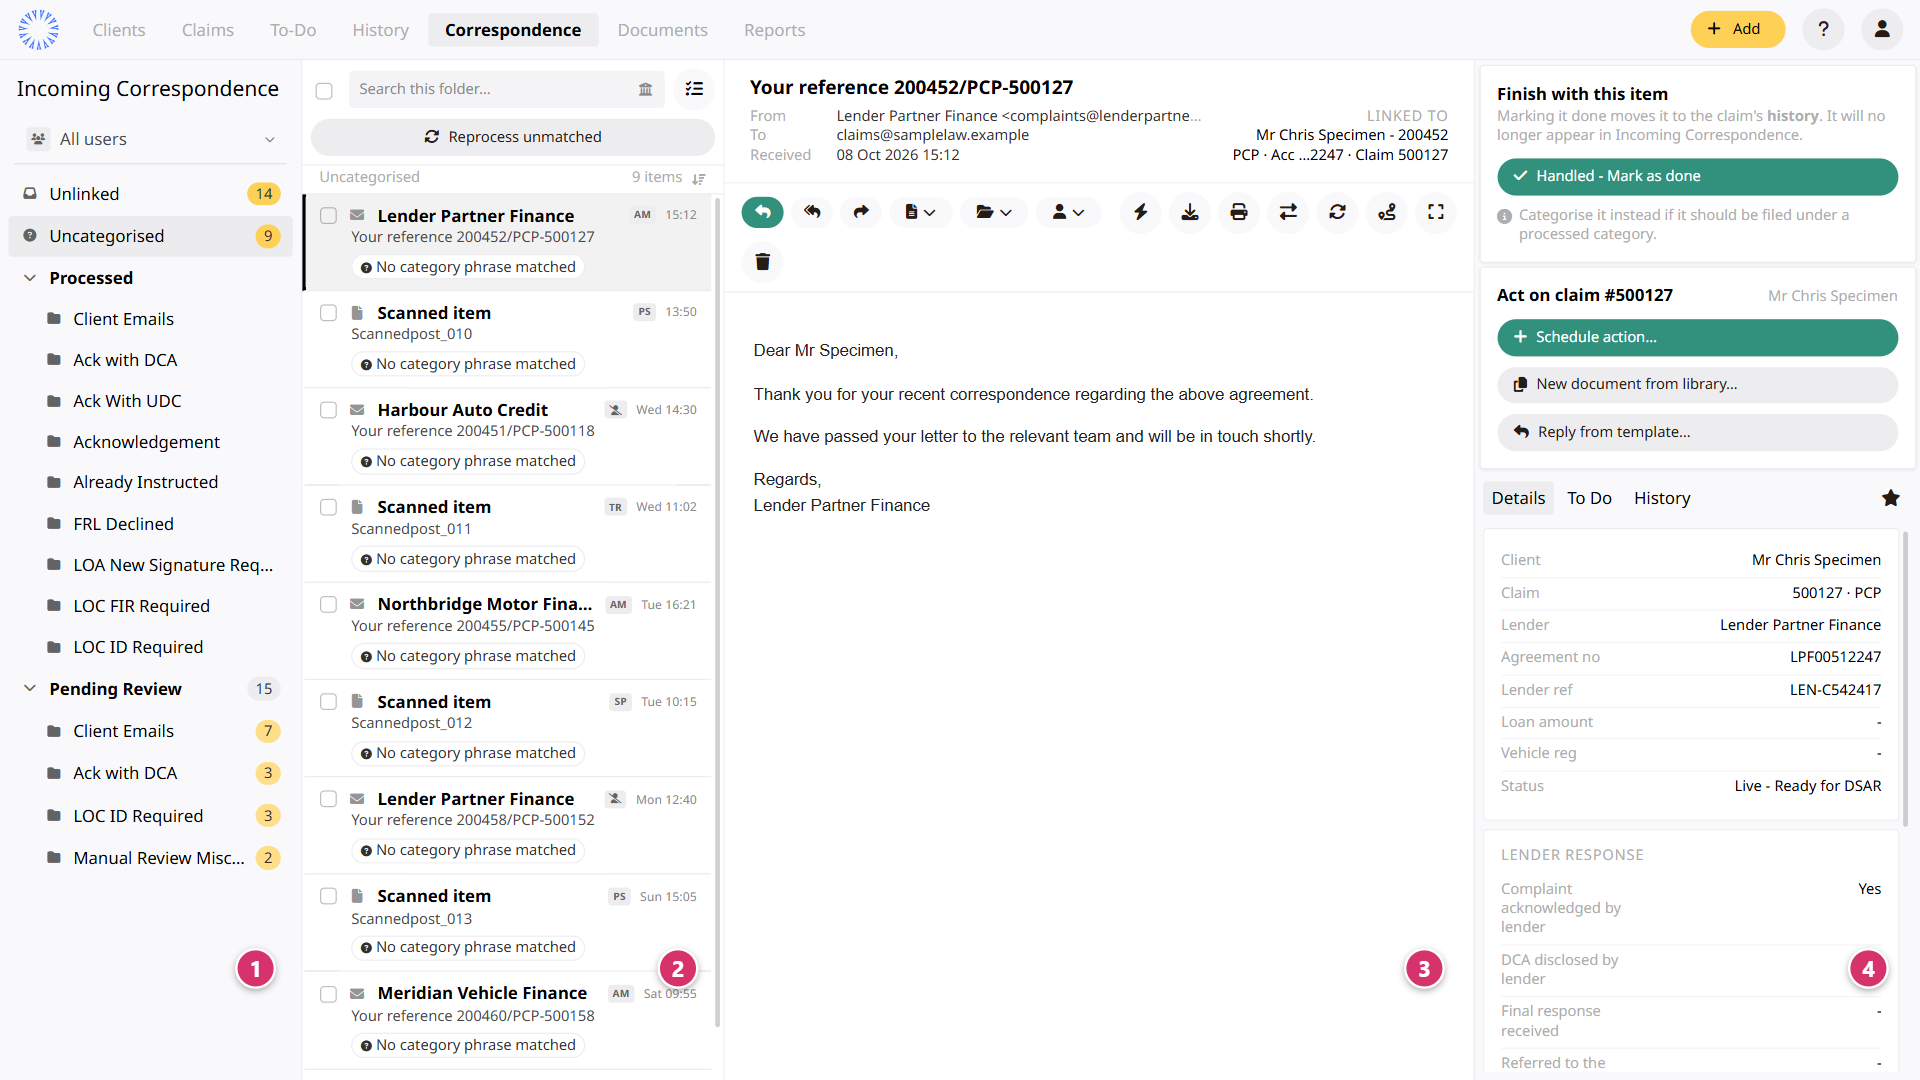
1 Folders · 2 Item list ·
3 Viewer · 4 Action panel
- Folders – the workflow steps, with the owner filter at the top.
- Item list – the contents of the selected folder.
- Viewer – the selected email, document or message, with its toolbar.
- Action panel – what you can do with the item, plus the linked claim’s details,
to-do list and history.
The Folders
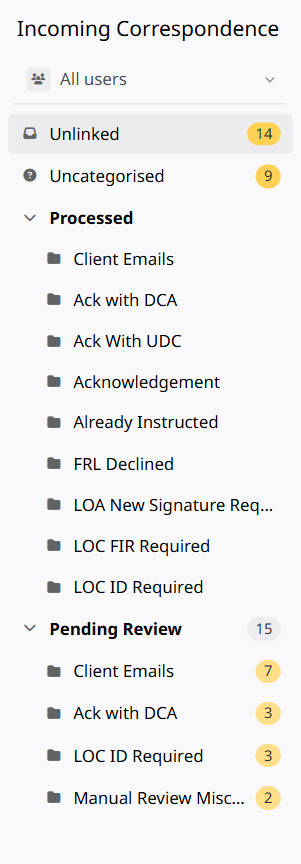
The folder tree. The numbers show how many items are waiting.
| Folder | What is in it | What to do |
|---|---|---|
| Unlinked | Items the system could not match to any client or claim. | Link each item (see Linking an Item to a Client and Claim), or reprocess if the match should have worked. |
| Uncategorised | Items matched to a claim, but the system could not tell what kind of correspondence they are. |
Categorise each item (see Categorising an Item), or mark it done if it needs no category. |
| Pending Review | Items the system identified but which need a person to look before anything runs. Grouped into Client Emails and one sub-folder per category. |
Review each item, then resolve it (see Finishing an Item). |
| Processed | Finished items, grouped the same way, kept for reference. | Nothing – this is the archive of handled correspondence. |
The category sub-folders come from your own correspondence categories. A sub-folder only
appears once it has items in it, and the counts refresh themselves every couple of minutes.
Processed folders show their count in the list header rather than in the tree.
Mine, All Users and Assigning Items
Every item has an owner. New items are shared out automatically between the users in your
email and scanned-post pools, where those are set up; anything else arrives
Unassigned.
The owner filter
The control above the folders decides whose items you see. It applies to every folder and
to the counts beside them. If you are in a pool it starts on Mine; otherwise it starts
on All users. You can also pick any colleague, or Unassigned. While a filter is
on, a note under the tree says so, and an empty folder offers Show items from all
users.
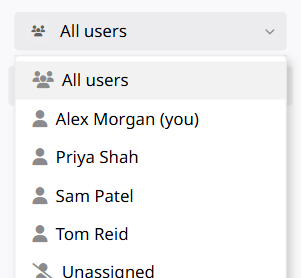
The owner filter: All users, yourself, each colleague, or Unassigned.
Assigning items
- One item – the person button in the viewer toolbar shows the current owner; pick
someone else, or No one – unassigned. - Several items – turn on select mode (see The Item List), tick the items and click
Assign. Ctrl-click or Shift-click several users to share the items
out between them. Bulk changes ask you to confirm first.
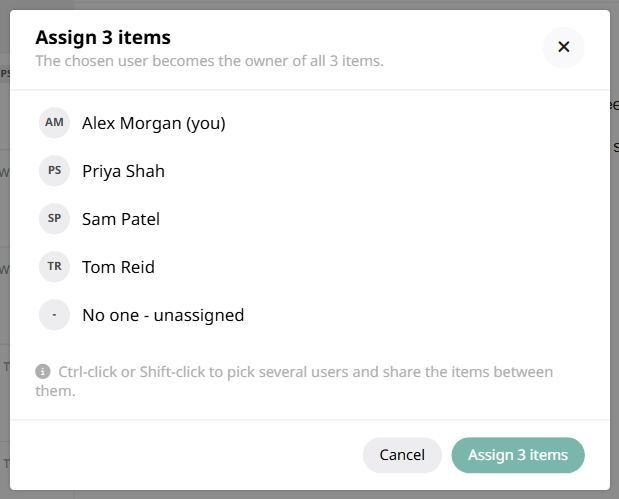
Assigning three selected items.
The Item List
The middle pane lists the selected folder’s items, newest first. Scroll to load more, and
click a row to open it.
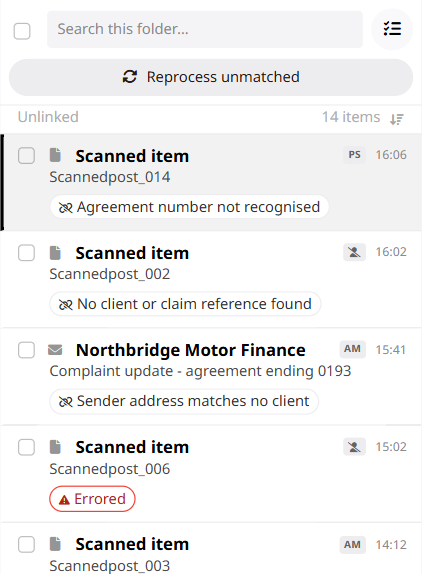
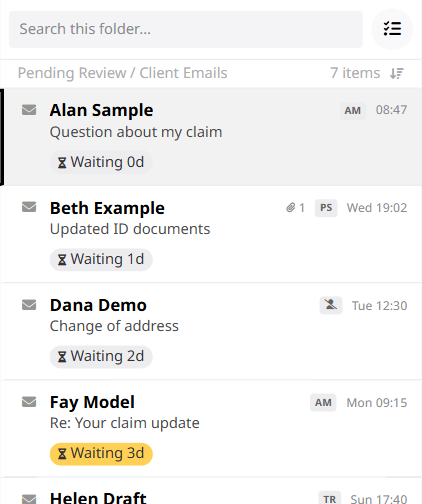
Each row shows the type icon (envelope for email, page for a scanned document),
the sender, the subject, the owner’s initials, the attachment count and the time, with status
chips underneath.
The chips
Chips only appear when there is something to say:
| Chip | Meaning |
|---|---|
| Reason (for example No client or claim reference found) | Why the item is in Unlinked or Uncategorised. Hover for the full wording. |
| Waiting Nd | How long a Pending Review item has been waiting. It turns amber at three days. |
| Claim #N | The claim the item is linked to (shown when no status chip is needed). |
| Errored | Something went wrong while processing. Click it to see what happened (see When Something Goes Wrong). |
| Reprocessing… | The item is in the current reprocess run and will update shortly. |
Whether an item was handled automatically or by a person is shown on its Details tab
(see Details, To Do and History).
Searching, filtering and sorting
- Search – the box above the list searches the current folder by sender or
subject. Typing a number finds items for that client or claim number. - Lender – in folders whose items are linked to claims, the bank button in the
search box lists the lenders in that folder with a count for each. Pick one to show only its
items. - Sort – the arrow beside the item count switches between newest first and oldest
first.
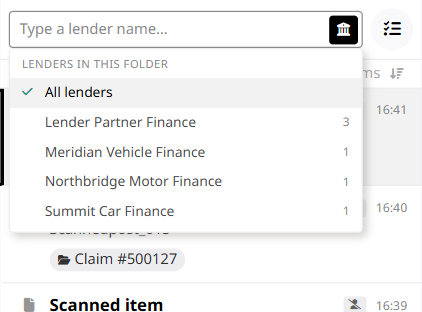
Filtering a folder by lender.
Select mode
The list button beside the search box turns on select mode. Tick items (or use the box at
the top to tick them all), then choose Assign,
Mark as done (in Uncategorised and Pending Review) or
Delete. Click the × on the bar to leave select mode.
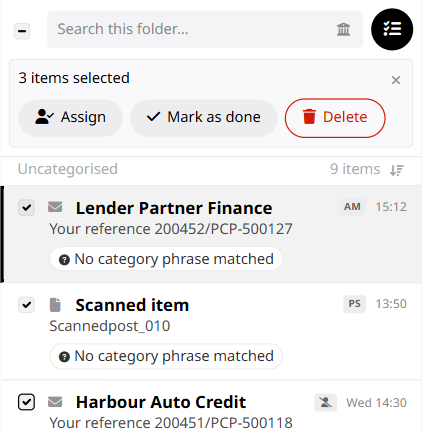
Select mode, with three items ticked.
Reading an Item
Emails
An email shows its subject, sender, recipients and received time, with the message below.
Attachments appear as tiles under the header – click one to preview it, or use its download
icon. The LINKED TO block shows the client and claim the item is filed against.
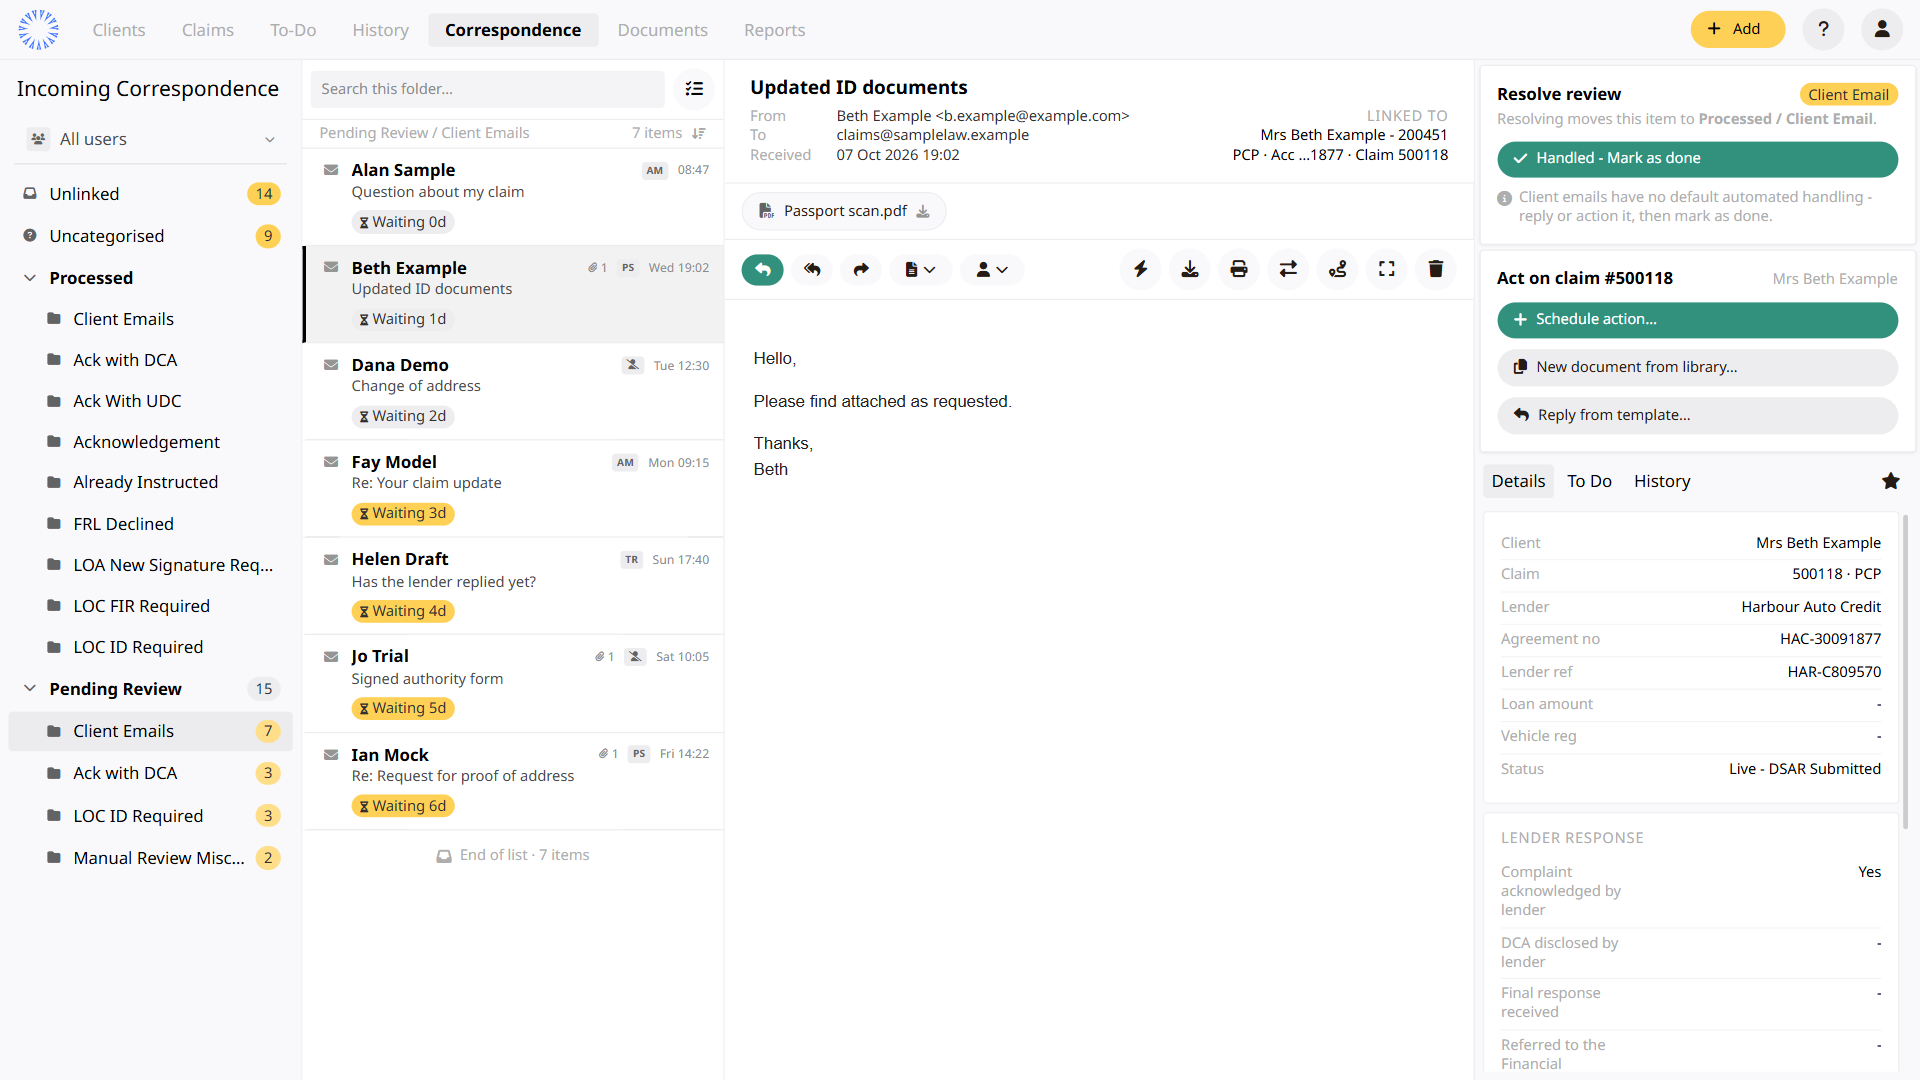
A client email in Pending Review, linked to a claim, with one attachment.
Scanned documents
A scanned document shows the filename, received date and page count. Use the toolbar to
zoom, fit the page to the width or height, and move between pages.
To find words in the document, click the magnifier (or press Ctrl+F
in the viewer). Matches are highlighted; use the arrows or Enter to step
through them, and tick Match case if needed. Esc closes the find
bar.
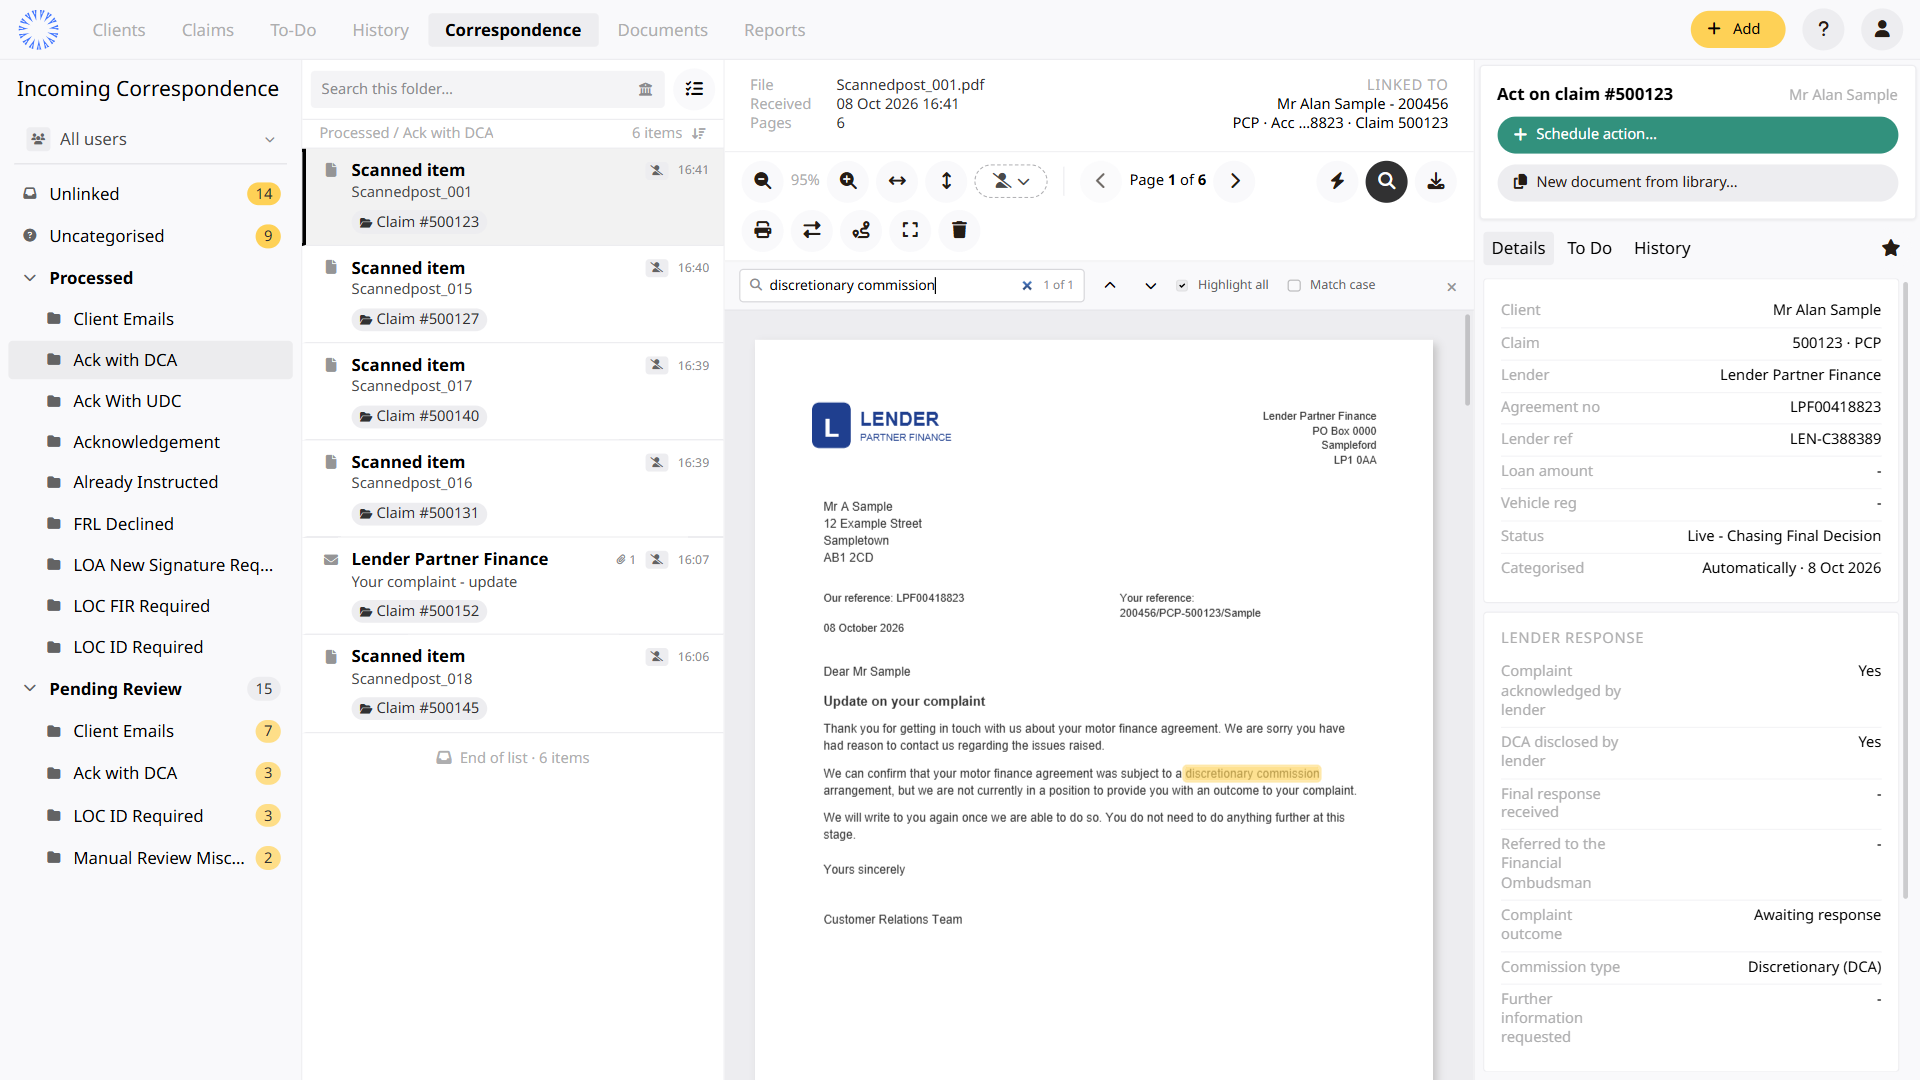
Finding a phrase in a six-page scanned letter.
Text messages, pop out, print and download
Text messages show as a message bubble with the delivery time. Every item can be opened in a
larger pop-out window, printed, or downloaded as the original email or file.
Deleting an item
The bin in the toolbar deletes the selected item after you confirm. To delete several, use
select mode (see The Item List). Delete only items that should never have arrived, such as junk or
duplicates.
Linking an Item to a Client and Claim
Linking turns an anonymous arrival into part of a claim’s record. Until an item is linked
you cannot reply to it or act on it. Start from the Link to client / claim button in
the action panel, the Not linked pill, or the Link this email to a client link in
the toolbar.
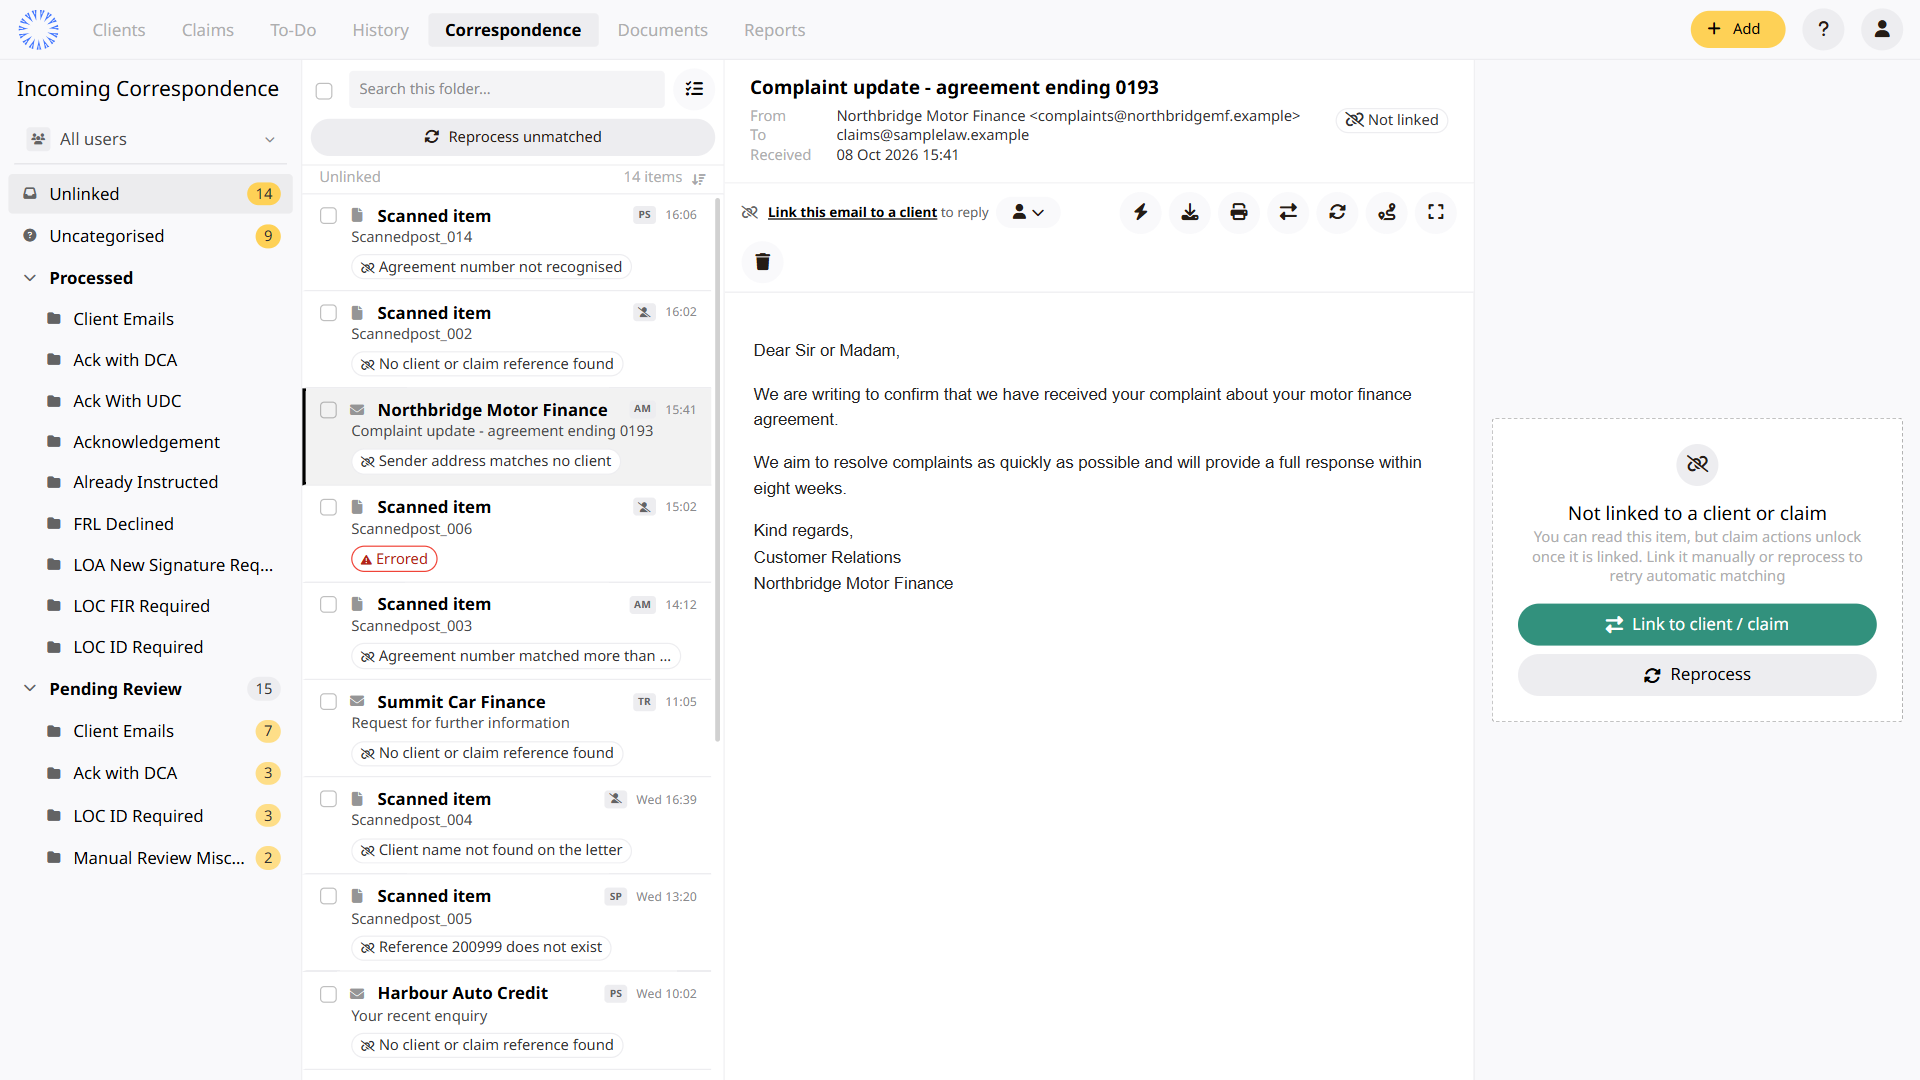
An unlinked email: the Not linked pill in the header, and the
Not linked to a client or claim card in the action panel.
- Find the client. Search by name, client number, claim reference or email address
(part of an address works). - Choose where to file it. Pick the claim – each one shows its claim type, lender,
agreement number and status – and click Assign. Or choose
Client only – no specific claim; you can choose the claim later with
Choose claim.
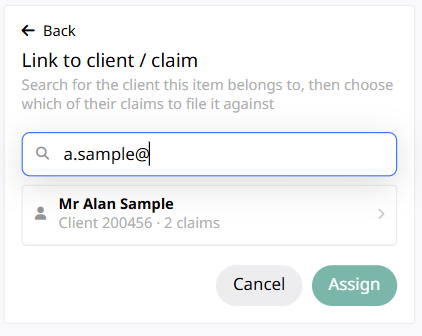
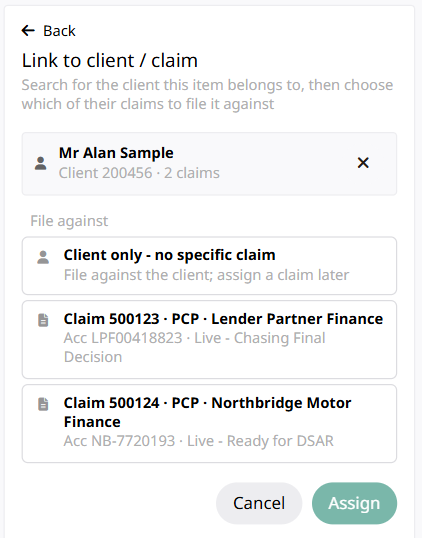
Finding the client by email address, then choosing the claim.
Once linked, the item moves on to the right folder and the next item in the list opens. If
filing an email against the client only would move it to Client Emails, you are asked
first.
Tip
Typing a claim reference in step 1 jumps straight to that claim,
already selected.
Linked to the wrong place?
Click Change client / claim (the swap icon) in the toolbar. You can re-link the item
from there, or click Unlink to remove the link completely and send the
item back to Unlinked to start again. Unlinking also cancels any follow-up work the item had
created that has not started yet.
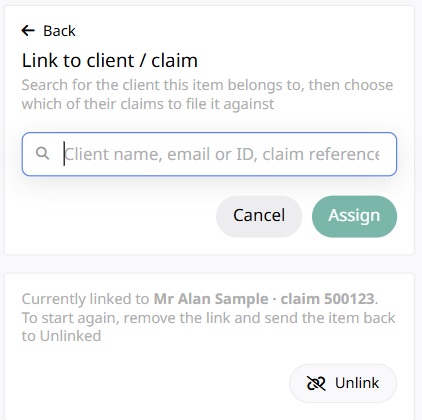
Re-link the item, or unlink it and send it back to Unlinked.
Categorising an Item
Categorising tells the system what an item is, which decides what happens to it
next. With an item open in Uncategorised (or a Pending Review folder), click the folder button
in the toolbar and pick the category.
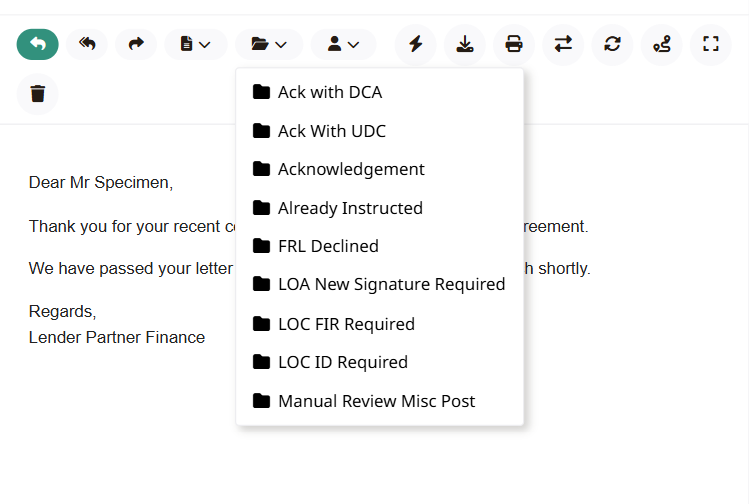
A confirmation explains what will happen – which follow-up action is run or scheduled, and,
when you re-categorise, that the old category’s outstanding work is replaced. It also asks how
to set the claim’s questionnaire answers:
- Re-parse the text (the default) – the system reads the item again and sets exactly
the answers an automatic categorise would. Where the text has to be re-read from scanned
pages, the button reads Re-read & categorise and takes a few
seconds. This option is not available for a letter that was split out of a longer scanned
document. - Pick the answers – choose from every answer the category can set, grouped into
Set every time and one group per sub-category (with the phrase it is recognised by).
Use the filter box to find an answer. Nothing is pre-selected, and picking none is fine.
Picking a second answer to the same question replaces the first.
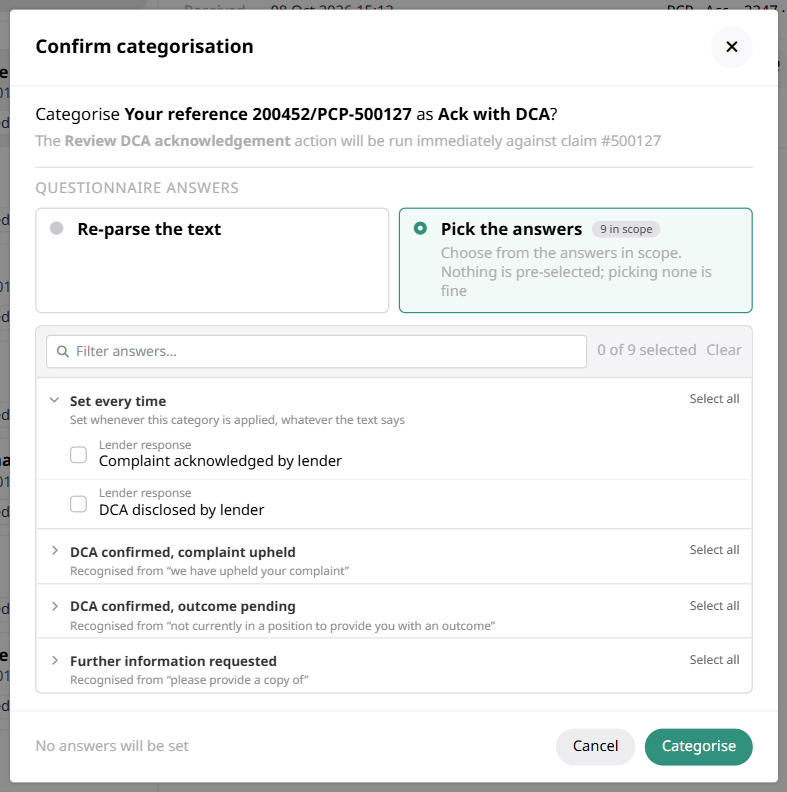
Categorising as Ack with DCA, choosing the answers by hand.
Reprocessing Items
Reprocessing asks the system to have another go – useful after you have fixed the cause,
for example adding a missing reference to the claim. For an item already linked to a claim,
reprocessing keeps the link and only works out the category again.
- One item – click the reprocess icon in the toolbar, or
Reprocess in the action panel. - Several items – in Unlinked and Uncategorised, tick the items, then click
Reprocess unmatched. The confirmation shows how many you ticked. - The whole folder – with nothing ticked, the same button queues every item in the
folder (or every item matching your search).
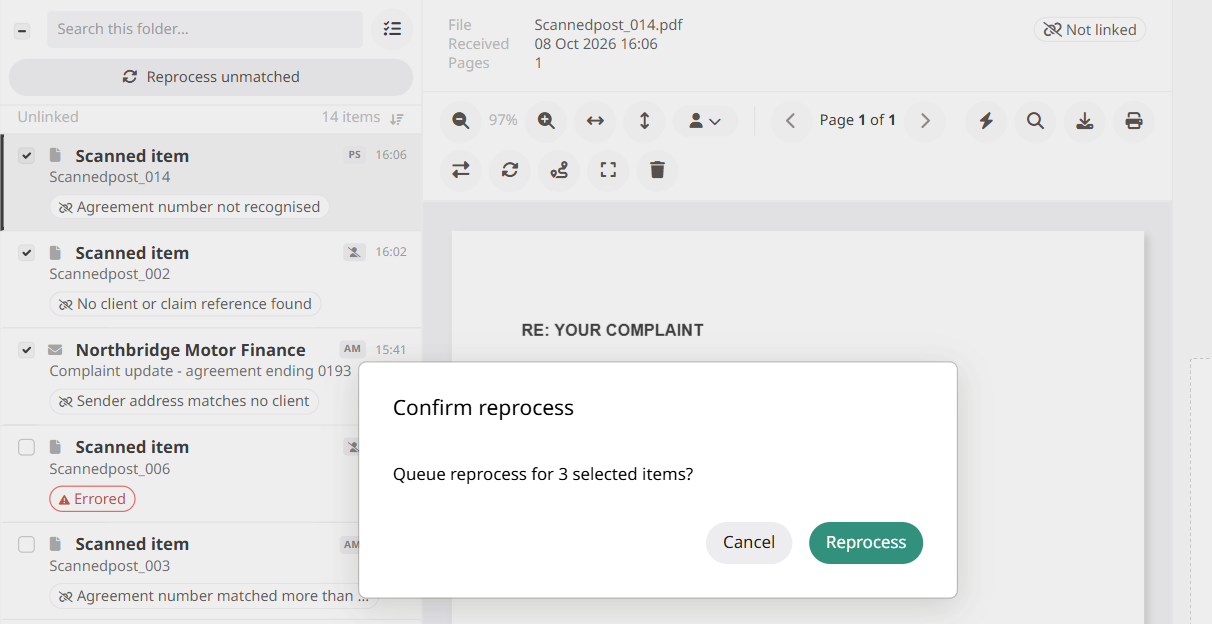
Reprocessing three ticked items.
While a run is under way, a strip above the list shows how many items are still
processing, and each queued row shows Reprocessing…. Items that match move out of the
folder; items that do not stay put.
Finishing an Item
Items in Pending Review show a Resolve review card with two choices:
- Run default category handling – you agree with the system: run the
category’s normal handling. The item moves to Processed / category. - Handled another way – Mark as done – you dealt with it yourself, or it needs
nothing: file it as processed without running the handling.
Client emails have no automatic handling, so their card offers just
Handled – Mark as done once you have read and dealt with the email.
Items in Uncategorised show a Finish with this item card.
Handled – Mark as done moves the item to the claim’s history without a
category, so it leaves Incoming Correspondence. Categorise it instead if it belongs in a
Processed category.
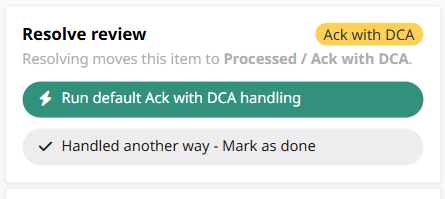
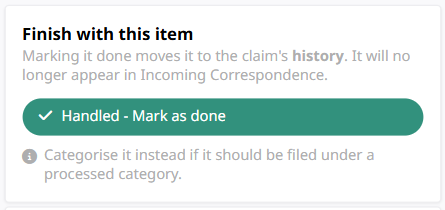
The Resolve review card (Pending Review) and the Finish card (Uncategorised).
Replying to and Forwarding Emails
For a linked email, the toolbar offers Reply, Reply All and Forward. Each opens the editor
in place of the viewer, addressed and with the original message quoted below. Everything you
send is saved to the claim’s history automatically.
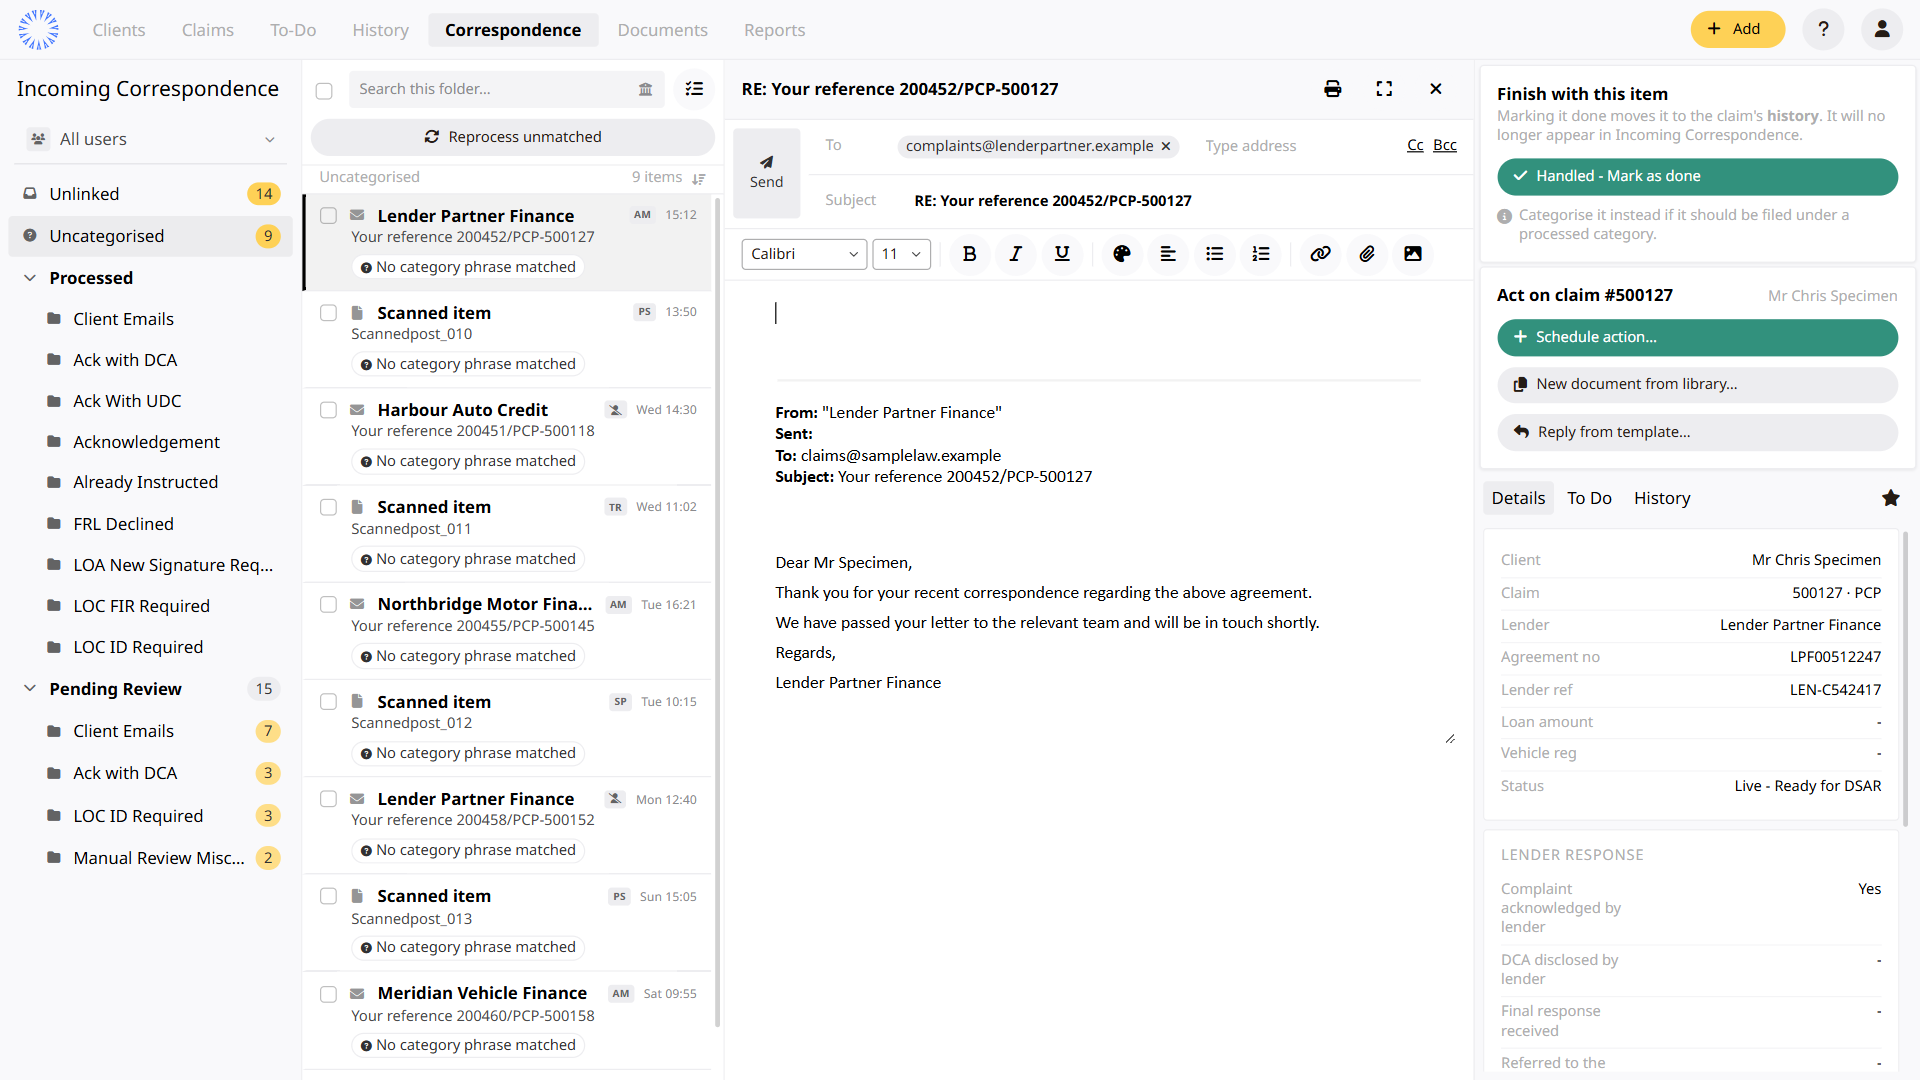
Replying. Send sits left of the address rows; print, pop out and close are
top right.
- Recipients – each address is a pill with an × to remove it; type to add more.
Cc and Bcc open those rows. - Attachments – the paperclip offers Upload from computer, From client
documents and From claim documents. - Formatting – fonts, bold, italic, underline, colours, alignment, lists, links and
pictures. - Pop out – open the draft in a larger window to write at length.
- Discard – close the editor to abandon the draft (it asks first). Moving to another
item with an unsent draft also asks.
Sending from the Template Library
Where a standard communication exists, use the template library instead of writing from
scratch: New document from library… in the action panel, or
Reply from template… to answer the selected email.
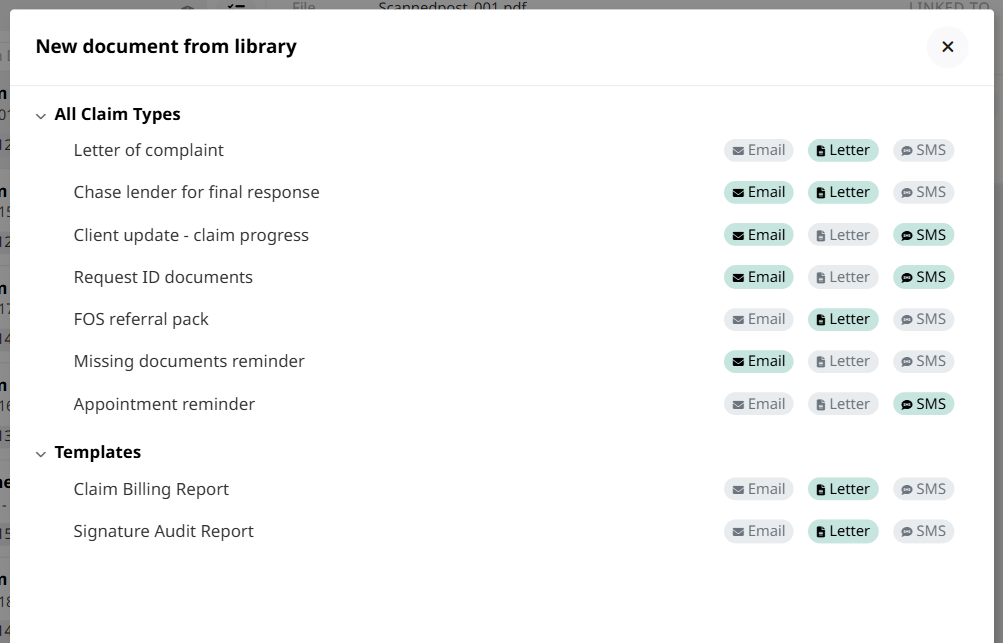
Each template shows how it can be sent – Email, Letter or SMS.
Templates arrive with the claim’s details filled in, ready to check and send:
- Email – opens in the same editor as a reply, with any generated document
attached. - Letter – shows a read-only preview exactly as it will be saved.
Save to history files it against the claim; print it from the same
window. - SMS – shows the client’s mobile number and the message, both editable, with a live
character count.
Quick Actions and Scheduling
Actions are the system’s units of work on a claim – letters to produce, checks to run,
tasks for colleagues. You can put new work on the claim or client without leaving this
screen:
- Quick actions – the lightning button in the viewer toolbar lists the actions your
administrator has set up, split into client level and claim level. Picking one runs it
straight away. - Schedule action… – in the action panel. Choose what it relates to (claim or
client) and the action, then who it is assigned to, an optional description and when it
should happen. Actions the system can run itself also offer
Run now. - Favourite actions – the star beside the tabs lists your commonly used actions;
picking one confirms and runs it.
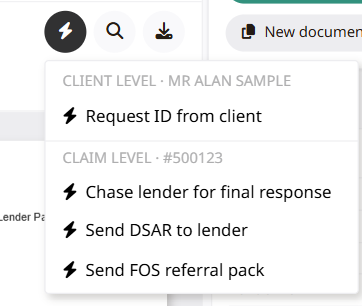
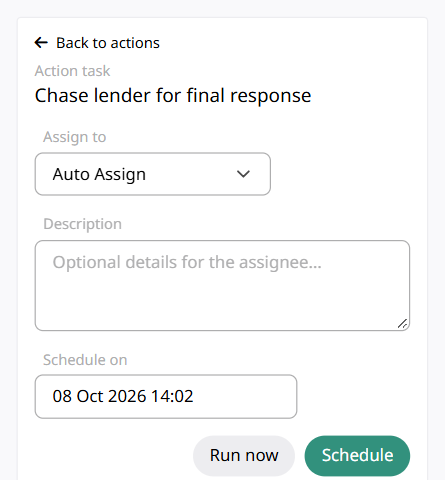
Quick actions run immediately; Schedule action sets the owner and date first.
Details, To Do and History
Once an item is linked, the action panel shows the claim alongside it:
- Details – the client and claim at a glance: lender, agreement number, lender
reference, status and the claim’s questionnaire answers. For processed items, the
Categorised row says whether it was done automatically or by whom. - To Do – the open actions on the claim. The + button schedules a new one.
- History – everything already done, including correspondence sent from this screen.
Use the filter above the list to show one type of entry; each type shows how many there are.
Click a row to open the sent email, letter or text in the pop-out viewer, where you can reply
or forward too.
Correcting the agreement number or lender reference
A misread digit at intake is the usual reason an item failed to match. Click the
Agreement no or Lender ref value on the Details tab to edit it.
Enter or the tick saves; Esc, the cross or a click
elsewhere cancels. The change is saved on the claim, so it applies to every item linked to
that claim.
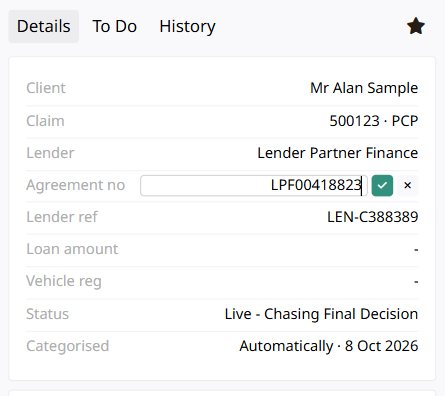
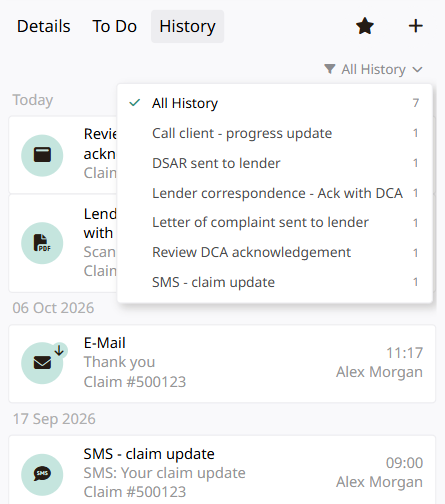
Editing the agreement number, and filtering History by type.
Opening the full record
The client and claim names in the LINKED TO block are links. They open the full record
in the Legacy Agent Portal in a new browser tab, so you keep your place here.
When Something Goes Wrong
Every item keeps a record of how the system processed it. Click How was this item
processed? in the toolbar, or an Errored chip in the list. The trace shows each step
with its time and the outcome, so you can see exactly why an item was not matched or
categorised.
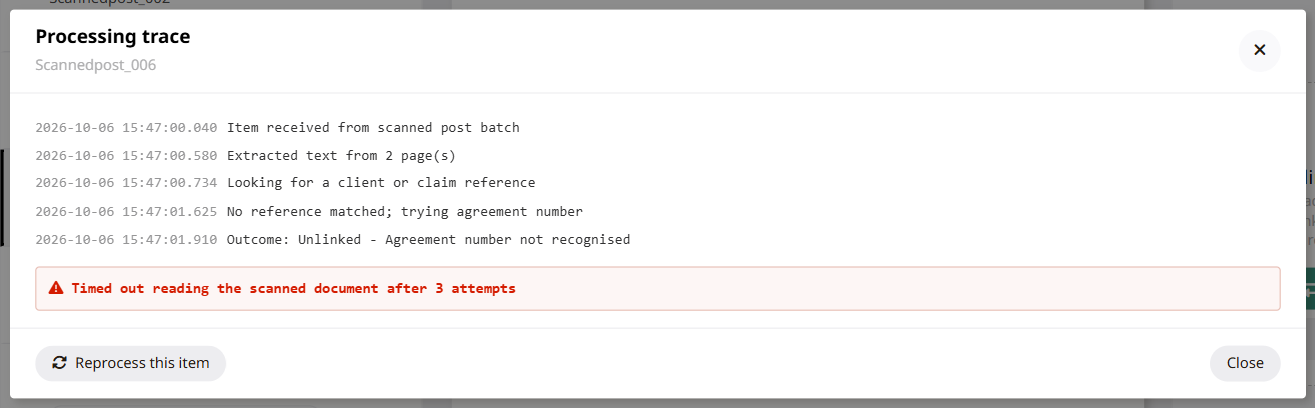
The trace of an item that errored, with Reprocess this item below.
From the trace of an Unlinked or Uncategorised item you can queue a reprocess directly. If a
trace shows a problem you cannot resolve – repeated errors, or an outcome that looks wrong –
contact your system administrator and quote the item’s subject and received time.
Quick Reference
| I want to… | Where |
|---|---|
| See only my items, a colleague’s, or unassigned ones | Owner filter above the folders (see Mine, All Users and Assigning Items) |
| Give an item to someone | Person button in the toolbar, or select mode and Assign (see Mine, All Users and Assigning Items) |
| Show one lender’s items, or oldest first | Bank button in the search box; arrow beside the count (see The Item List) |
| Act on several items at once | Select mode: Assign, Mark as done, Delete (see The Item List) |
| Find words in a scanned document | Magnifier in the toolbar, or Ctrl+F (see Reading an Item) |
| Link an item to a client or claim | Link to client / claim in the action panel (see Linking an Item to a Client and Claim) |
| Fix or remove a wrong link | Swap icon – Change client / claim, then re-link or Unlink (see Linking an Item to a Client and Claim) |
| Tell the system what an item is | Folder button in the toolbar (see Categorising an Item) |
| Make the system try again | Reprocess – toolbar icon, action panel, or Reprocess unmatched (see Reprocessing Items) |
| Clear a Pending Review or Uncategorised item | Resolve review or Finish with this item card (see Finishing an Item) |
| Answer an email | Reply / Reply All / Forward in the toolbar (see Replying to and Forwarding Emails) |
| Send a standard letter, email or text | New document from library… / Reply from template… (see Sending from the Template Library) |
| Run or schedule work on the claim | Lightning button, Schedule action…, or the star (see Quick Actions and Scheduling) |
| Correct the agreement number or lender reference | Click the value on the Details tab (see Details, To Do and History) |
| See why an item was not matched | How was this item processed? in the toolbar (see When Something Goes Wrong) |